Your Easiest Guide to Rich, Creamy Homemade Eggnog Ice Cream
Imagine a dessert so luxurious, so utterly delightful, it feels like a warm holiday hug and a cool, refreshing treat all at once. Now imagine making it yourself, with surprising ease, any time of year. We’re talking about homemade eggnog ice cream, a true game-changer in the world of frozen desserts. Forget waiting for the festive season to roll around; this rich, spiced, and utterly smooth ice cream brings joy to any occasion. If the thought of making ice cream from scratch seems daunting, prepare to be pleasantly surprised. This article will guide you through crafting the
easiest eggnog ice cream recipe you’ve ever encountered, transforming a traditional holiday drink into an irresistible frozen delight.
Unveiling the Magic: Why Homemade Eggnog Ice Cream is a Game Changer
Eggnog, at its heart, is a cooked, drinkable custard—a comforting blend of eggs, milk, sugar, and spices that has graced holiday tables for centuries. When transformed into ice cream, it transcends its liquid form, becoming a thick, velvety dessert that is truly in a league of its own. Don't let the "egg" in eggnog intimidate you; it's the secret to its incredible richness and smooth texture. The beauty of making your own is the control you gain over every nuance of flavor and texture.
This isn't just about recreating a store-bought flavor; it's about elevating it. Picture the familiar warmth of nutmeg, the delicate flecks of sweet vanilla, and the subtle, robust kick of spiced rum, all swirled into a cold, luxurious spoonful. Beyond its intrinsic deliciousness, homemade eggnog ice cream offers a unique versatility that few desserts can match. It’s perfect on its own, but also a fantastic companion to other treats, making it a dessert staple you'll want to revisit all year.
Crafting Your Creamy Masterpiece: The Easiest Eggnog Ice Cream Ingredients & Steps
Making this incredible dessert is simpler than you might think. The active prep time is minimal, with most of the waiting dedicated to chilling and freezing—perfect for a weekend project or an evening treat. Here’s what you’ll need and how to bring it all together to create the
easiest eggnog ice cream.
Essential Ingredients:
To achieve that signature creamy texture and festive flavor, quality ingredients are key.
*
Whole Milk: 2 cups. The foundation of your custard, providing essential creaminess. For a slightly lighter version, you *could* use 2% milk, but be aware it might result in a less creamy finish.
*
Heavy Cream: 1 cup. Non-negotiable for that rich, luxurious texture. Half-and-half is an option for a lower-fat alternative, but again, the decadence won't be quite the same.
*
Granulated Sugar: 3/4 cup, divided. Used for sweetness. You can experiment with brown sugar for a deeper, molasses-like note, or a sugar substitute if monitoring sugar intake.
* *First portion:* 3/8 cup for the milk mixture.
* *Second portion:* 3/8 cup for the egg yolks.
*
Large Egg Yolks: 5. These are crucial for creating a silky-smooth custard, acting as an emulsifier and thickener. If eggs are a concern, some recipes use cornstarch as a thickener, but it won't replicate the exact texture.
*
Prepared Eggnog: 1 cup. This is where the signature flavor truly shines! You can use your favorite store-bought eggnog, ensuring it's of good quality, or embark on an adventure to make your own from scratch for an even more personalized touch. For guidance on making your own ingredient eggnog, explore
Skip the Store: Make Your Own Luxurious Eggnog Ice Cream Today.
*
Nutmeg: 1/2 teaspoon, freshly grated if possible, plus more for garnish. Essential for that classic holiday spice. Freshly grated nutmeg offers a significantly more potent and aromatic flavor. Cinnamon can be a pleasant alternative if you don't have nutmeg, but it will alter the traditional profile.
*
Vanilla Extract: 1 teaspoon. While not always explicitly listed, vanilla beautifully enhances the sweet and creamy notes, providing those "gorgeous flecks of sweet vanilla" you envision.
*
Spiced Rum (Optional): 1-2 tablespoons. A splash of Christmas spirit! Brandy, bourbon, or white rum can also be used. For a non-alcoholic version, simply omit it—the ice cream will still be wonderfully flavorful.
Step-by-Step Process:
1.
Heat the Milk Mixture: In a medium saucepan, gently combine 2 cups of whole milk, 1 cup of heavy cream, and 3/8 cup of granulated sugar. Heat this mixture over medium heat, stirring occasionally, until it's hot but not boiling. You want it to be steamy and warm to the touch, just beginning to simmer around the edges.
2.
Prepare the Egg Yolks: While the milk mixture is heating, grab a separate, heat-proof bowl. Whisk together the 5 large egg yolks with the remaining 3/8 cup of granulated sugar until the mixture becomes pale yellow and slightly thickened. This process incorporates air and begins to break down the sugar.
3.
Temper the Yolks: This is a crucial step for the
easiest eggnog ice cream to prevent scrambling! Slowly drizzle about half a cup of the hot milk mixture into the egg yolk mixture, whisking continuously and vigorously. This gradually raises the temperature of the yolks without cooking them. Once tempered, pour the warmed egg yolk mixture back into the saucepan with the remaining hot milk mixture.
4.
Cook the Custard: Continue to cook the combined mixture over medium-low heat, stirring constantly with a wooden spoon or spatula. Do not allow it to boil. Cook until the custard thickens enough to coat the back of your spoon (it should leave a clear trail when you run your finger across it). This usually takes about 5-8 minutes.
5.
Infuse Flavor: Remove the saucepan from the heat. Stir in the 1 cup of prepared eggnog, nutmeg, and vanilla extract. If using, now is the time to stir in the spiced rum (adding it after cooking prevents the alcohol from evaporating).
6.
Chill Thoroughly: Pour the custard base into a clean bowl or container. Place plastic wrap directly on the surface of the custard to prevent a skin from forming. Chill in the refrigerator for at least 4 hours, or ideally, overnight. This step is vital for the ice cream's final texture and ensures it churns properly.
7.
Churn the Ice Cream: Once thoroughly chilled, pour the custard into your ice cream maker and churn according to the manufacturer's instructions. This usually takes 20-30 minutes, resulting in a soft-serve consistency.
8.
Freeze to Firm: Transfer the churned ice cream to an airtight container. Press a piece of parchment paper or plastic wrap directly onto the surface to minimize ice crystal formation. Freeze for at least 4 hours, or until firm, before serving.
Elevating Your Scoop: Serving Suggestions and Customization
The versatility of this homemade eggnog ice cream is truly astounding. While utterly delicious on its own, here are some ideas to make it even more special:
*
Classic Pairings: Scoop it atop a warm slice of pecan pie or pumpkin pie for an indulgent holiday-inspired dessert.
*
Beverage Boost: Drop a scoop into a mug of hot chocolate for a rich, creamy twist, or try it affogato-style by pouring a shot of hot coffee over it for an unforgettable treat.
*
Cookie Sandwiches: Sandwich a generous scoop between two soft pumpkin sugar cookies for a festive and delightful ice cream sandwich.
*
A Little Extra Spirit: For those feeling extra festive, pour a tiny splash of spiced rum or brandy directly over your serving.
*
Non-Alcoholic Fun: Remember, this ice cream is equally delightful without alcohol. The flavors of nutmeg, vanilla, and eggnog shine through beautifully, making it a treat for all ages. For a deeper dive into the alcohol considerations, check out
Boozy or Not: Create Versatile Eggnog Ice Cream at Home.
*
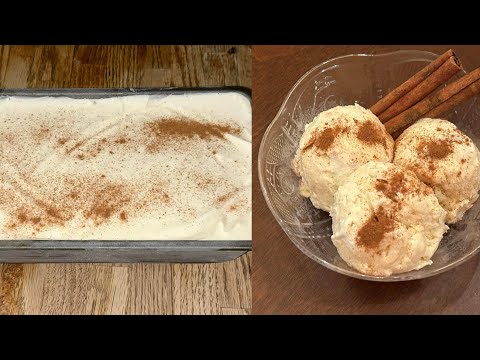
Garnish Goals: A sprinkle of fresh nutmeg, a dollop of whipped cream, or some chocolate shavings can elevate your presentation.
Tips for Perfection: Mastering Your Homemade Eggnog Ice Cream
Even with the
easiest eggnog ice cream recipe, a few insider tips can make all the difference:
*
Don't Rush the Chill: Resist the urge to churn the base before it's thoroughly chilled. A cold base churns more efficiently and results in a smoother, creamier ice cream.
*
Fresh is Best: Whenever possible, grate fresh nutmeg. The aroma and flavor are far superior to pre-ground versions.
*
Ice Cream Maker Matters: Ensure your ice cream maker's bowl is frozen solid (if it's a freezer bowl type) or that your compressor machine is ready to go. A properly functioning machine is key to good texture.
*
Storage Savvy: Store your homemade ice cream in an airtight container to prevent freezer burn and ice crystals. Pressing plastic wrap directly onto the surface before sealing can further protect it.
*
Embrace Patience: While the active cooking time is short (15-20 minutes), the chilling and freezing take time. Plan on about 8 hours total from start to serve, but remember most of that is passive waiting.
Crafting your own creamy, dreamy eggnog ice cream is a rewarding experience that extends the joy of a beloved holiday flavor throughout the year. With this comprehensive guide, you have everything you need to make the
easiest eggnog ice cream that will impress your guests and satisfy your cravings. So, gather your ingredients, fire up your ice cream maker, and prepare to indulge in a truly luxurious homemade treat that tastes like Christmas in a bowl, no matter the season!